

Celebrate America Recycles Day with this Crafty Idea!

Oh how we hate to part with things at Garnish. Sometimes it comes back to bite us as we wade through piles and piles of scrap fabric wondering where to store it all, but mostly we love repurposing anything with an ounce of "possibility" that is waved under our noses! That is why we rejoice in the thought of America Recycles Day on November 15th.
In the spirit of the holiday, we thought we'd let you in on a secret project that make great use of some items other folks might be tempted to pitch. Keep reading to see how to grant new life to old pillows, linens and buttons.
Create a Fun New Pillow
Repurpose Vintage Linens, Buttons, and even an old Pillow Form (if you have one)
You will need:
- Pillow form (perhaps one laying around that currently sports an ugly cover)
- Fabric to cover the form front and back (again, if it's recycled it's that much cooler)Vintage linen - a tablecloth, napkin, pillow case, or tea towel would work (stains and all)
- Vintage buttons, or the extra buttons they give you when you buy something nice that the buttons might pop off of one day
- Ribbon
- Thread
- Sewing Machine (unless you are WAY more patient than we are)
- Measuring Tape
- Scissors
We are going to make a pillow with a 2" flange/ruffle around the edge like a Euro Sham. The back will have 2 pieces of fabric that overlap 1.5" and close with buttons and ribbon loops.

Step 1. - Measure your pillow form from edge to edge with a fabric measuring tape.
Step 2. - Cut one piece of fabric (the pillow front) to be 5" wider and longer than your pillow form (so if you pillow form is 24" h x 28 w" you would cut the piece to be 29" x 33"). This allows for a 2" flange and 1/2" seam allowance on each side.
Step 3. - Cut 2 back pieces according to the following... The height should be 5" more than the height of your form (for flange and seam allowance). The width should be half the width of the pillow form plus 4.5" (flange and seam allowance plus 1.5" for closure overlap and another 1/2" for seams allowance on the closure side).
Step 4. - Cut out a piece of your linen that you like and pin it to the front piece of your fabric where you would like it. Zig-Zag stitch around the edge of it to secure.
Step 5. - With one of your back pieces on the side of the back that will form the button closure turn under edge 1/4", press, turn under again 1/4" and stitch down. Repeat with the other side.
Step 6. - Sew on your buttons so the egdes of the buttons are roughly 1/2" from the finished edge of one of the back pieces. It is a good idea to use a backer button if your fabric is rather light (see photo).
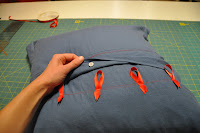 Step 7. - Lay the piece with the buttons on top of other back piece so there is 1.5" of overlap from one finished edge to the other. Make loops with cut lengths of ribbon, loop them around the buttons and pin them to the back piece that does not have the buttons on it. Sew down the loops in one long stitch (contrast thread is cute).
Step 8. - Lay the front piece on your work surface face up. Lay the back piece with the buttons on it face down. Lay the final piece with the ribbon loops on it face down as the top layer. Line up the edges of all layers and pin.
Step 9. - Stitch all the way around the outside of the pillow 1/2" from the edge.
Step 10. - Turn the pillow right side out and iron the edges. Stich in 2" from the edge all the way around to create the flange.
Step 11. - Insert the pillow form and button it up! Now you have a darling new pillow to give as a gift or keep for yourself! Good work, we knew you could do it!
** Please note, we are new to writing instructions (and aren't very good at following them!) so if you have questions please feel free to call: 503.282.3200.

Leave a comment